
Live Scratcher is a MaxForLive device that attempts to emulate the sound of a record being played forwards and backwards on a turntable, much like a DJ would do when scratching.
The device simply moves a playhead over a sample to replicate the turntable movement, and you use a MIDI note to ‘cut’ the sound in as it moves.
There are various ways of controlling the playhead: either manually with the mouse, with a dial on Push, or with a dial / fader on a MIDI controller.
You can also automate the playhead within a MIDI clip using Automation Envelopes, or use the built-in LFO to move the playhead forwards and backwards automatically.
Much like the action a DJ would normally perform with a crossfader, the sound can then be ‘cut in’ with any note in the C3-C5 range, either in a MIDI clip or played live.
By combining different note patterns with moving the playhead forward and backward over the sample in various rhythmical movements, you can go some way to creating a reasonably authentic scratching sound.
Choose from the two built-in classic scratch sounds, “Ahhh” & “Fresssh”, or load your own custom samples. To load a custom sample, drag/drop each sample (one at a time) over one of the four ‘User’ slots. You can also record directly into any of the User Slots from any track in Ableton Live.
Please see the video above for a demo and quick walkthrough. For further details, please refer to the product manual.
System requirements:
- MacOS 64bit / Windows 10/11.
- Ableton Live 11, Ableton Live 12 (Live 12 required for the example Live Project)
- Max For Live (included with Live Suite or bought separately for Live Standard)
Tips:
- Works best with samples of 1-2 seconds in length. Anything longer or shorter and it won’t sound as good. You can negate this a little by increasing the ‘Drag’ amount for longer samples, but try to stick to 1 or 2 seconds for the best sound.
- Also works best with particularly noisy, aggressive-sounding samples. Screams, white noise, car screeches, etc. all work well.
- When using a custom sample, adding a short amount of silence before and after your sample helps give the initial transient more ‘attack’ as the playhead passes over. Without the silence beforehand, things can sound a little ‘mushy’ as the playhead passes each end of the sample.
- Try to use the highest quality sample you can. Avoid MP3s and try to go for .wav or .aiff if possible.
- Although you’re limited to four custom samples, you can still add more instances of the device if you wish, either each on a separate track or together in a Drum Rack. The only limit here is your CPU, although the device itself is not particularly CPU-intensive.
Here’s the original tutorial video for the first version of Live Scratcher. Goes into more detail about the nature of scratching and how to create Clips with Automation Envelopes:
And here’s an excellent video by Bosh. He provides a great tutorial on how to use Live Scratcher, as well as showing how he uses the device to create dub-style sounds:
FAQ:
Q: I’m using v1.0.5. How do I load user samples?
A: You need to drag / drop your chosen sample (either from your computer’s Finder / Explorer or from Live’s own browser) directly onto one of the four ‘User’ slots. Make sure the sample is in .wav / .aif format and that you drag / drop one sample at a time.

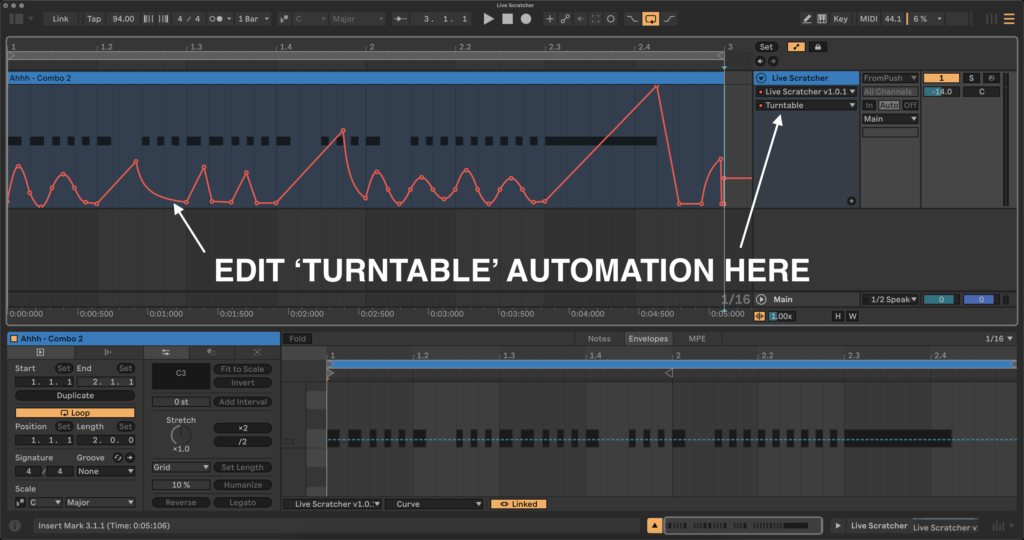
Q: Why can’t I edit automation inside the clip when I’m in Arrangement View?
A: When in Arrangement View, the clip edit window at the bottom of the screen is used for editing parameter Modulation, not Automation. Automation envelopes are an absolute value, Modulation envelopes are always relative to the current parameter value. (See this link for more info on Modulation vs. Automation.) As the device’s parameters are not enabled for Modulation control, please use the main Arrangement view for automating parameter movements:
Q: Can I use the device with longer samples?
A: You can but it won’t work nearly as well. Samples of no longer than 1-2 seconds are recommended.
Q: Will this work with a jog wheel or DVS?
A: No. Well, not yet at least… 😉
Q: Can I map Playhead / Turntable control to my Push’s touch strip?
A: Yes, but it requires a bit of a workaround. To do this, put your Push’s touch strip in Mod Wheel mode (hold Select and move the touch strip), then place an Expression Control device before Live Scratcher. Map the Target to the slider underneath the main waveform in Live Scratcher and set the Expression Control as follows:

Updates:
v1.0.5
Fixed:
- User samples were not always loading along with the Live Set. This has now been fixed.
- The auto normalise feature was proving to be problematic. Replaced the auto-normalise checkbox with a manual normalise button. Clicking the ‘Normalise’ button will now normalise the volume level of the currently selected User Sample. (Remember to save and re-import any normalised samples if you want the normalised version to be saved with your Live Set.)
v1.0.4
Added:
- Added ‘Audio Input’ section. You can now select any other track in Live and use it as an audio input for recording new User Samples. Use the four record buttons to record into the four corresponding User Sample Slots.
- Added input gain and input monitor controls for incoming audio.
- Added four ’Save’ buttons. Each will save the corresponding User Slot to disk as a .wav file. When clicked, you’ll be prompted to save to a folder. Note that in order for your recorded sample to be saved with your project (or as a device preset in your User Library), you must first use the ‘Save’ button to save the sample to your hard drive. The resulting file then needs to be dragged back into a User Slot. As long as the original sample does not change location on your hard drive, it will be automatically loaded whenever you reload your set or load your preset. It is recommended that you save these into your Project’s ’Samples / Recorded’ folder.
- Added ‘Normalise’ button. When enabled, any imported user sample or recorded audio will be automatically normalised once loaded / recorded.
- Added 1.5, 2, 3, 4, 6 & 8 bar time divisions to the LFO Rate.
- Added LFO Time Mode control and Frequency/Hz Dial. When ‘Hz’ is selected, the LFO runs freely and the ‘Lock to Transport’ button is deactivated.
- Added LFO Retrigger button. LFO can now be manually retriggered when in Hz Time Mode.
- Updated Push controls.
- Updated Info View text.
Fixed:
- Playhead now responds more smoothly when mapped to an external MIDI controller or moved with the mouse.
- Sin LFO in ‘Note’ Time Mode now starts at the beginning of the sample rather than at the end.
- There’s no longer an audible pop/click when switching between samples when “Note Gate’ is off.
- Volume now reacts better to MIDI velocity changes (when ‘Vel to Vol’ is enabled).
- The buttons: Note Gate, Lock, LFO On and Velocity are now mappable, automateable, and their settings are saved with your Live set and into stored Presets.
GUI Changes:
- ‘ON’ button is now a check box labelled, “Note Gate”. Turn on to only allow the device to make a sound when a MIDI note (range: C3-C5) is held.
- ‘VEL’ (Velocity) button is now a check box labelled, “Vel to Vol”.
- ‘LOCK’ button is now a padlock icon and has moved to above the LFO Note/Hz Time Mode selector.
- GUI colours changed from fixed to dynamic and now correctly match the chosen Theme.
v1.0.3
- Added 3 more custom sample slots. Just drag & drop your chosen sample over any of the four ‘User’ slots to load it.
- Any MIDI note from C3 and above will now ‘open’ the crossfader (previously just C3).
- Descriptions for each control added to Info View.
- Added 3/4 note division to the LFO.
- The vinyl / turntable graphic can now be used to move the playhead (click and drag up/down)
v1.0.2
- Fixed a bug where the same custom sample loads across multiple device instances.
- Fixed a bug with the waveform not being displayed correctly after replacing a custom sample.
v1.0.1
- Changed name to ‘Live Scratcher’.
- Replaced graphic of turntable.