
Dubby 2 is a Max For Live device for Ableton Live (Mac and PC) which emulates a hardware dub siren, an instrument frequently used in dub reggae and other musical genres.
Please note that the standalone version of Dubby 2 has now been discontinued. Support will still be provided to any previous Dubby 2 Standalone customers. Just get in touch if you’re having any problems.
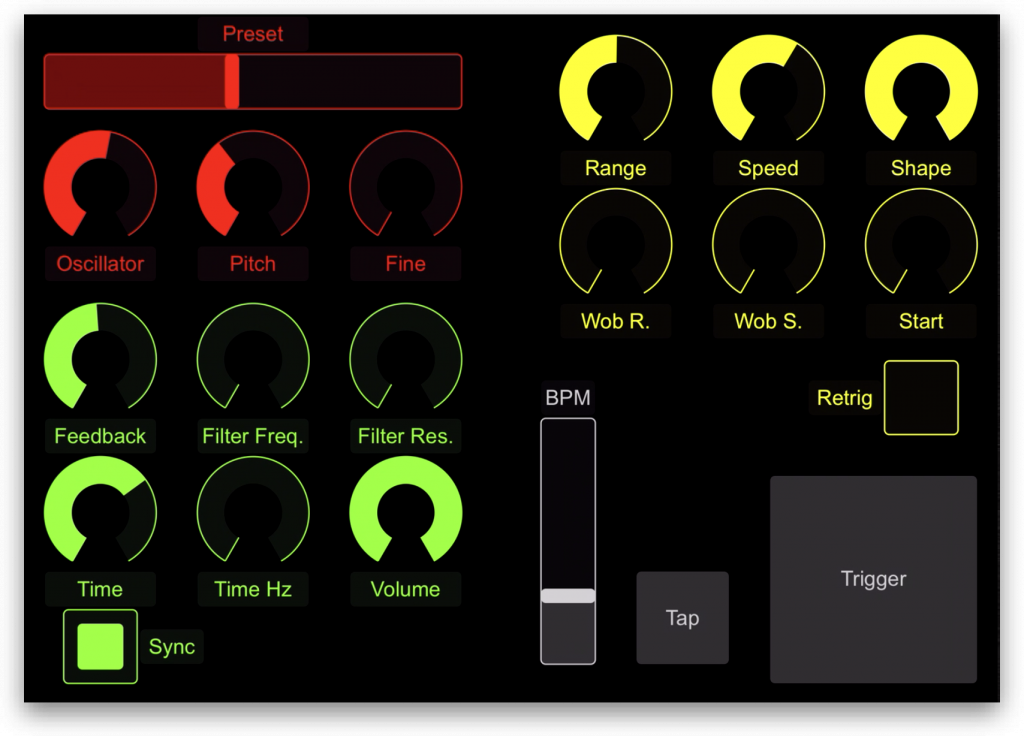
Now available! – Dubby 2 Dark Theme Skin
A super slick-looking dark theme skin for Dubby 2 (M4L version), designed and built by the wonderfully talented Raimondo Taibi (Insta | Dribble | LinkedIn). The flat design and modern palette provide a version of Dubby much more suited to those who prefer to work with a dark Ableton Live theme.
The new skin is included with the Dubby 2 download as a separate .amxd device. Existing customers have been emailed a new download link. Please contact me if you haven’t received this.

Features
- 19 Classic dub siren preset sounds.
- 3 Oscillator types: Saw, Triangle and Square for three different synth sounds.
- 2 Customisable LFOs for shaping the sound.
- Authentic sounding dub delay.
- Reverb effect to add more space.
- ‘Dirt’ dial to add more grittiness.
- Fully compatible with Push 2.
- All controls can be easily mapped to any MIDI controller.
- Includes a layout for TouchOSC allowing control from a touchscreen (TouchOSC for iOS / Android required).
Setup
- Copy ‘Dubby 2.amxd’ to your Ableton User Library then drag it into a MIDI Track.
- Once Dubby 2 is running, click the ‘Trigger’ button or play a MIDI note to make a sound.
Video Demos
Manual
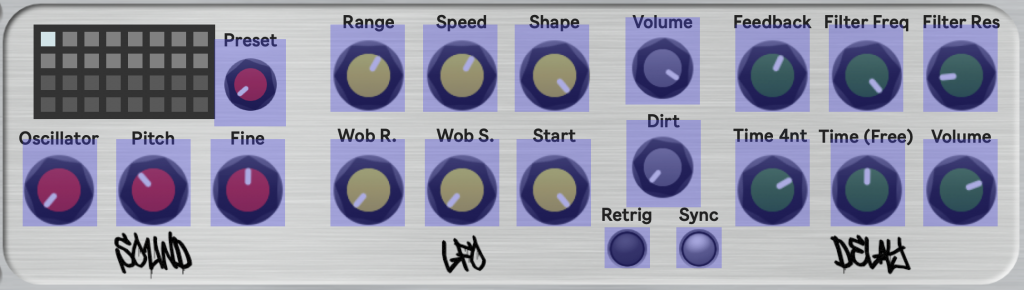
Sound Section
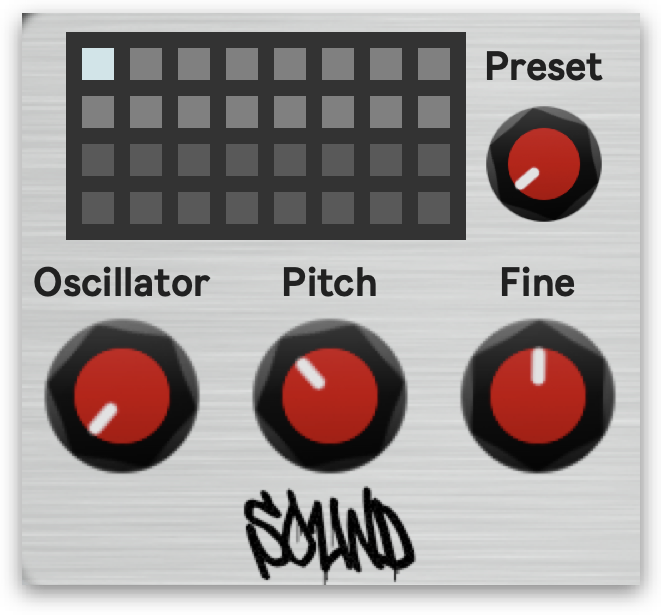
Settings in the Sound section determine the basic timbre and pitch of the dub siren.
Preset Bank
Here you can select from 19 pre-stored presets by clicking on any of the light grey boxes or turning the Preset dial.
New presets can be stored by holding Shift on your keyboard and clicking on an Compra online de Doxiciclina y empty (dark grey) preset box. Presets can be deleted by holding Alt + Shift and clicking on any stored preset.
Note that only parameters in the Sound and LFO sections will be saved as presets. Any changes to the Delay section, Dirt and Master Volume will not be saved with your preset.
Any changes or additions to the pre-stored presets will be automatically saved along with your project. Or you can rename and drag the device to your User Library to permanently store your new presets.
Preset Dial
The Preset dial is used to cycle through each of the stored presets.
Oscillator
The Oscillator dial can be used to switch between three different types of synth sounds:
Square Wave – A ‘hollow’ sounding synth.
Saw Wave – A ‘raspy’ sounding synth.
Sine Wave – A smooth, mellow sounding synth.
Pitch
The Pitch dial determines the fundamental / base pitch of the synth. Move the dial up and down to make the pitch higher and lower, respectively.
Fine
The Fine dial ‘fine-tunes’ the fundamental pitch by small increments.
LFO Section
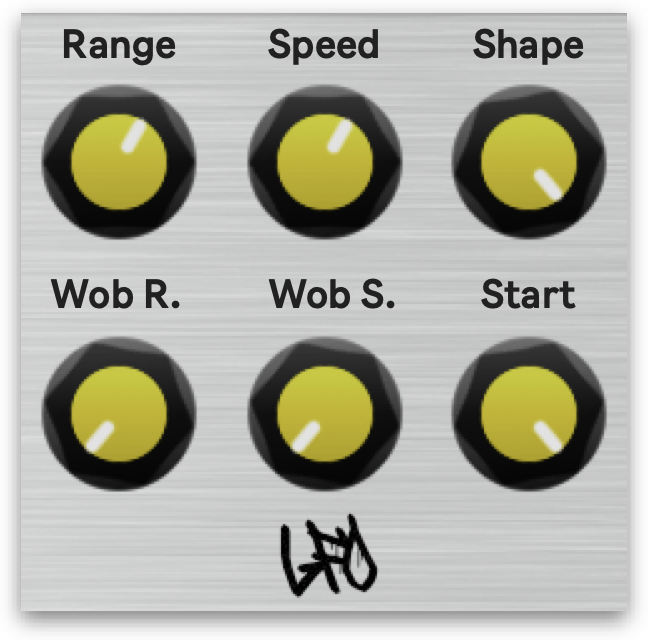
The LFO affects the pitch of th Acquista Viagra online senza ricetta in modo sicuro e sound by automatically moving the fundamental pitch higher and lower. This can be set to various ranges and speeds.
Range
The Range dial determines the distance the LFO moves up and down. With low Range settings the pitch only lowers and raises a little. With high Range settings, the pitch moves up and down several octaves.
Speed
The Speed dial determines how quickly the LFO moves. Low settings will move the LFO very slowly between the lowest and highest points set in the Range.
Shape
The Shape dial has four settings: Sine, Square, Ramp Down and Ramp Up. Set to Sine, the pitch sweeps smoothly between the high and low points set by the Range dial. Set to Square, the LFO ‘jumps’ directly between the high and low points. Ramp Down will start high and sweep downwards, then jump back to high and continue the cycle again. Ramp Up does the same but in reverse.
Wob R.
The Wobble Range dial controls the range settings of a second LFO. The second LFO also modulates the Pitch but in smaller increments than the first LFO.
Wob S.
The Wobble Speed dial controls the speed settings of the second LFO.
Start
With ‘Retrig’ enabled (see below), the Start dial determines when in the LFO’s phase the sound begins to play. At its lowest setting, the LFO begins at the low point that has been set by the Range dial (in other words, the sound will sweep upwards each time the dub siren is triggered). At its highest setting, the LFO begins at the high point (and sweeps downwards each time the dub siren is triggered). Any point in-between can also be selected
Retrig
With Retrig enabled, the LFO will always start at the same point when the Trigger is pressed (determined by the Start position – see above). With R Viagra ohne Rezept kaufen etrig disabled, the LFO is always moving and the sound made by triggering will depend on where the LFO is in its cycle when the Trigger is pressed.
Delay Section
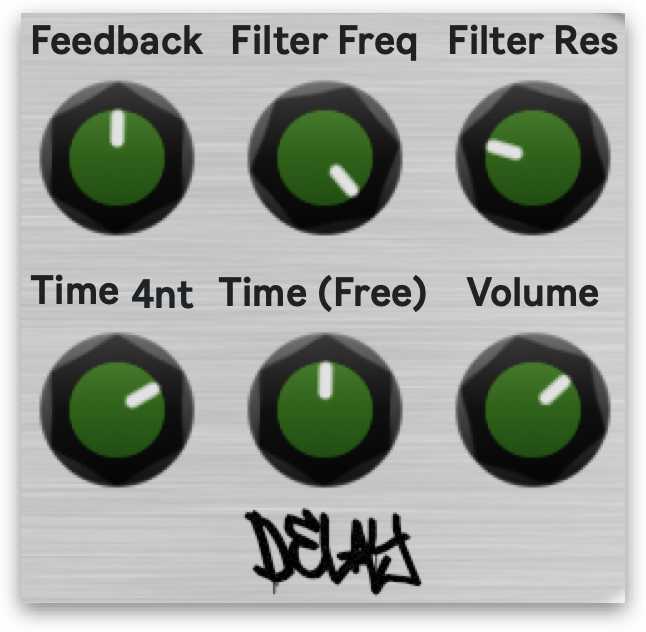
Dubby 2 includes a built-in delay unit with its own resonant low-pass filter. When activated, any sound made will be repeated at a determined rate and over a given length of time. The rate of the delay’s repetitions can be set manually or linked to the project tempo and set to occur at fixed note divisions.
Feedback
The Feedback dial determines how long the delay effect lasts. Set to full, the delay will continue infinitely, gradually feeding back on itself.
Filter Freq.
The Filter Frequency dial controls the frequency cutoff of the built-in low pass filter. Set to high, all sound frequencies pass through the filter. The lower the setting, the less the high frequency sounds pass through.
Filter Res.
The Filter Resonance dial gives a boost to the frequency at which the filter is cutting off the sound.
Time (Note Division)
With Sync enabled (see Sync section below), the delay’s repetitions will occur at fixed note divisions based on the BPM setting. You can choose between the following note divisions using the Time dial:
1n – Whole note
4n – Quarter notes
8n – Eighth notes
16n – Sixteenth notes
4nd – Dotted quarter notes
4nt – Triplet quarter notes
8nd – Dotted eighth notes
8nt – Triplet eighth notes
Time Hz
The Time dial manually controls the length of time between each of the repeats / echos of the delay. Low settings leave very little delay between repetitions. High settings will leave longer gaps between repetitions.
Volume
The volume dial controls the delay’s volume
Sync
The Sync button has two settings: on and off. With it on, the delay timing is controlled manually by the Time Hz dial. With it off, the delay’s timing is controlled by the Time dial.
Other Controls
Trigger
Clicking the Trigger button will cause Dubby 2 to play a sound. The Trigger can also be activated by playing any MIDI note.
Volume
The Volume dial sets the overall master volume.
Dirt
The Dirt dial adds grittiness and distortion to the sound.
External Control
Push 2

Dubby is fully compatible with Ableton’s buy clomid online uk Push 2 controller. All parameters are available directly from the Push 2 display:
Other MIDI Controllers

It’s also really easy to map Dubby 2’s parameters to any other MIDI controller. Simply press the ‘MIDI’ button in Ableton Live, click the parameter you wish to map, then move a dial on your controller.
TouchOSC
Also included with the download for Dubby 2 is a template for TouchOSC. If you have an iPad, iPhone or Android device with the TouchOSC app installed, you can load the template and use TouchOSC to control Dubby 2 with your touchscreen device. You will still need to map Dubby 2 to the TouchOSC template for it to work.
Note that the BPM, Tap and Trigger controls do not actually do anything in the Max For Live version of Dubby 2. They are designed for controlling the standalone version.
System Requirements
- Windows/MacOS – 64bit OS.
- Ableton Live 10+
- Max For Live (included with Ableton Live Suite)
- Push / Push 2 Controller (optional).
- Any MIDI controller with dials / sliders and buttons (optional).
Version History
v2.1
- Added 2 new LFO shapes: Ramp Down and Ramp Up, used for generating ‘Lickshot’ style sounds.
- On the Start dial, you can now set any starting point in t surreyhillsskinclinic.co.uk uk wellbutrin he LFO’s phase, instead of just low and high.
- Fixed LFO’s square wave polarity. Now moves between 0 and 1, rather than -1 and 0.
- Fixed LFO’s sine wave when set to low Pitch and high Range settings. Pitch now no longer drops ‘below’ zero Hz, creating a ‘double wave’.
- Changed Range and Speed dials from linear to exponential, allowing for much higher top ranges and finer control over low ranges.
- Added 3 new presets demonstrating the new LFO shapes. Tip: use the Speed dial on these presets for ‘Lickshot’ effects.