
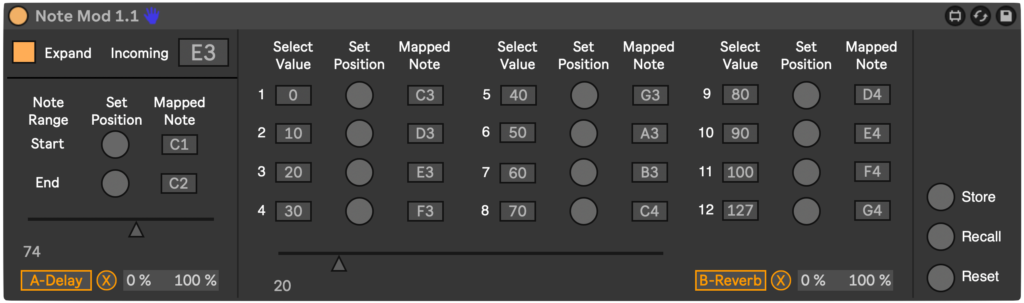
Mapping a Range of Notes:
- First play the note you wish to be the first in the range. You can see the note you’re currently playing in the ‘Incoming’ area.
- Click ‘Set Note Range – Start’. You should now see the note you’ve just mapped in the ‘Mapped Note’ area.
- Next play the note you wish to be the last in the range and click ‘End’. Now, as you play notes within the range you’ve set, you should see the slider below moving.
- Finally, you need to map the slider to your chosen parameter. click ‘Map’ then click any parameter in Live. Your note range should now be mapped to that parameter.
Mapping Individual Notes:
- Click the ‘Expand’ button to toggle the expanded view on.
- Play the note you wish to be mapped.
- Drag ‘Select Value’ to the parameter value you wish to have the note mapped to.
- Click ‘Set Position’.
- Repeat this for up to 12 different notes.
- Each note should now be mapped to the points you’ve chosen on the slider below.
- Finally click ‘Map’ then click any parameter in Live. Your individual notes should now be mapped to that parameter.
Updates:
v1.1
Added:
- Added another four mappable points (for a total of 12).
- Added ’Store’. ‘Recall’ and ‘Reset’ buttons (visible in expanded view). You can now store, recall and reset any note mappings you’ve made. Clicking ’Store’ will ensure your mappings are saved along with your Ableton Live Set.
Fixed:
- Device no longer floods the Undo History.
- You can now use multiple instances of the device.
- Minor GUI improvements.
System requirements:
- Windows/MacOS – 64bit OS.
- Ableton Live 9+
- Max For Live (included with Ableton Live Suite)